n8n AI Workflow Automation: Step-by-Step Tutorial
This n8n AI workflow automation tutorial shows you exactly how to build, test, and deploy AI-powered workflows inside n8n. Whether you’re a beginner or looking to automate business processes, you’ll learn how to build an AI workflow in n8n using real examples and step-by-step instructions.
After scanning this guide, you’ll understand how AI workflow automation with n8n works and how to create scalable automations for sales, support, and operations.
You’ll learn:
- How to set up n8n
- How to connect an AI model
- How to build a real automation workflow
- How to test and deploy it
- How to monitor and optimize performance
Table of Contents
What Is n8n?
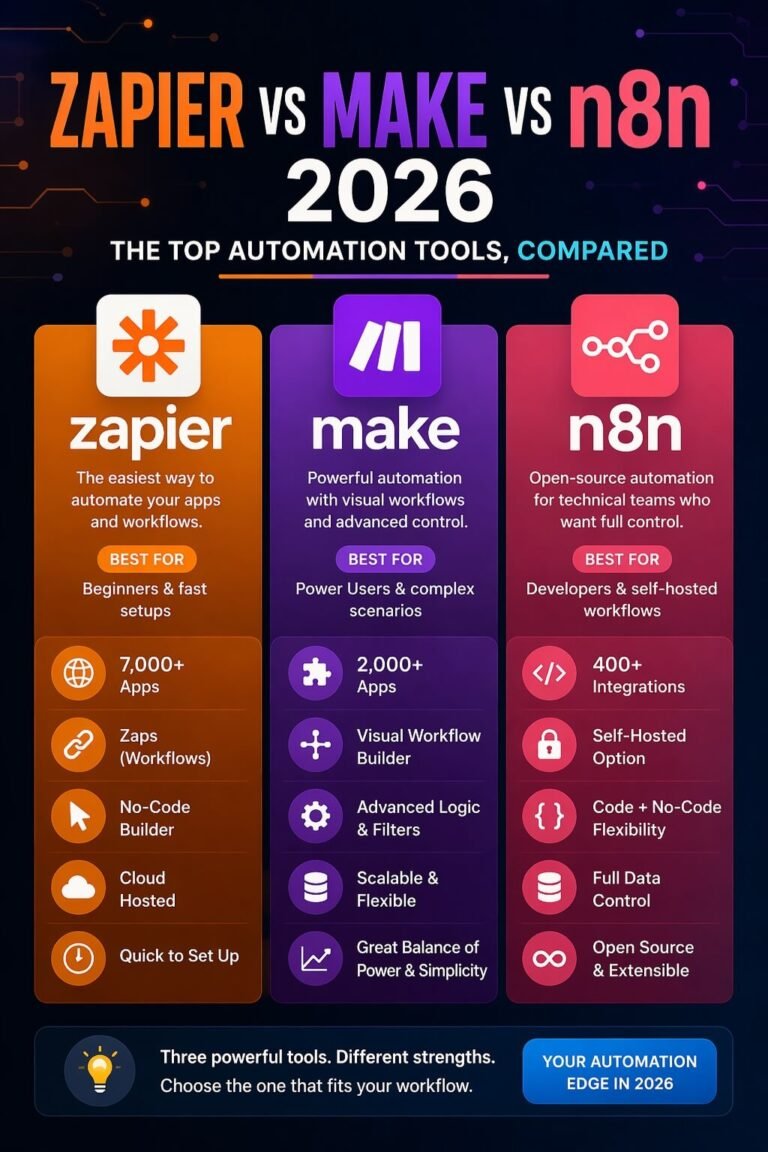
n8n is a visual workflow automation tool. You can learn more about the platform on the official n8n website. Think of it as a more flexible alternative to tools like Zapier or Make—but if you’re unsure which platform fits your needs, this detailed comparison of Zapier vs Make vs n8n breaks it down clearly.
Zapier + backend logic + full control. But unlike many no-code tools, n8n allows:
- Custom logic
- Code nodes
- API integrations
- Self-hosting
- AI integrations
That makes it ideal for serious AI workflow automation—especially if you’re exploring real-world use cases like AI automation for real estate or scalable systems across industries.
Why Use n8n for AI Workflow Automation?
n8n combines visual workflow building, custom logic, API integrations, and AI nodes in a single platform. Compared to many no-code tools, n8n gives you complete control over workflow execution, making it ideal for advanced AI workflow automation.
- Build AI workflows visually
- Connect OpenAI, Anthropic, and other LLMs
- Add conditional logic and custom code
- Self-host for maximum flexibility
- Create scalable business automations
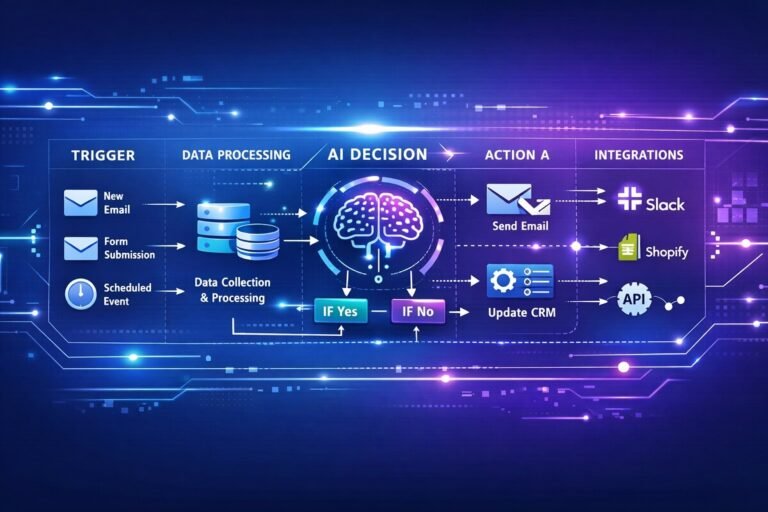
How n8n AI Workflow Automation Works
Understanding this workflow architecture makes it easier to build reliable and scalable AI automations in n8n. Every n8n AI workflow follows a simple pattern:
- A trigger starts the workflow.
- Data is collected and prepared.
- An AI model processes the information.
- Logic nodes make decisions.
- Actions are executed automatically.
Step 1: Install and Set Up n8n
You have two options:
Option 1 – Cloud (Beginner Friendly)
Use n8n Cloud for quick setup.
- Create an account
- Log in
- Start building workflows immediately
Option 2 – Self-Hosted (Advanced)
You can install via:
- Docker
- npm
- VPS
- Local machine
For production AI workflows, self-hosting gives you more control and lower long-term cost.
Step 2: Understand the n8n AI Workflow Structure
Every n8n workflow has three core parts:
- Trigger – What starts the workflow
- Processing Logic – What happens next
- Output Action – What gets executed
Example:
- Trigger → New Form Submission
- Processing → AI generates response
- Output → Send email reply
Step 3: Create Your First n8n AI Workflow (Real Example)
Let’s build a simple:
AI Email Auto-Responder Workflow
This type of workflow is widely used across industries—from support automation to AI tools for small businesses looking to reduce manual workload.
Step 3.1 – Add a Trigger
Click “Add Node”
Choose:
- Gmail Trigger
or - Webhook Trigger (for more flexibility)
This starts the automation when a new email arrives.
Step 3.2 – Add an AI Model Node
Add an AI Node.
You can connect:
Different AI models excel at different tasks. For example, content-focused workflows may benefit from comparing tools such as Notion AI vs Jasper before choosing the best model for your automation workflow.
Configure:
- API Key
- Model (e.g., GPT-4 class model)
- Prompt instructions
Example prompt:
You are a professional support assistant.
Reply clearly and politely.
Keep response under 150 words.
Pass the incoming email content into the AI node.
“Choosing the right model and tool stack is critical—especially when comparing solutions tailored for industries like legal, where tools differ significantly (see best AI workflow tools for law firms).”
Step 3.3 – Add Logic Control (Optional but Powerful)
Use:
- IF node
- Switch node
- Function node
Example:
- If email contains “refund” → send to support team
- If email is FAQ → auto-respond
This prevents bad automation.
Step 3.4 – Send the AI Response
Add:
- Gmail Send Node
or - SMTP Node
Map:
- AI output → Email body
- Sender → Original email sender
Now your workflow:
Trigger → AI → Email Send
Step 4: Test the Workflow
Before activating:
- Click Execute Workflow
- Send a test email
- Inspect each node output
Check:
- Is the prompt working?
- Is formatting correct?
- Are variables mapped properly?
Never deploy without testing.
Step 5: Activate and Deploy
Once stable:
- Click Activate
- Monitor execution logs
Your AI automation is now live.
Step 6: Advanced AI Workflow Patterns
Here’s where n8n becomes powerful.
1️⃣ Multi-Step AI Processing
Example:
- Extract email intent
- Classify topic
- Generate structured response
- Save to CRM
You can chain multiple AI nodes.
2️⃣ AI + Database Integration
Connect:
- Airtable
- Notion
- PostgreSQL
- Google Sheets
“If you’re evaluating different platforms for building AI-powered systems, our guide to AI workflow tools we recommend compares the top solutions for automation, orchestration, and business workflows.”
Use AI to:
- Enrich leads
- Score prospects
- Generate summaries
- Auto-tag entries
If you’re comparing platforms, check out this breakdown of the best AI workflow automation tools for businesses to understand where n8n stands.
3️⃣ RAG (Retrieval Augmented Generation)
Advanced setup:
- Store documents in a vector database
- Retrieve relevant context
- Feed into AI prompt
This creates accurate AI agents with business knowledge. This approach becomes even more powerful when combined with strategies for integrating AI into human workflows, ensuring AI enhances—not replaces—decision-making.
“Learn more about Retrieval‑Augmented Generation (RAG) and how it enhances AI workflows.”
Step 7: Managing and Optimizing n8n AI Workflows
Building is easy. Managing at scale is where discipline matters.
Use Version Control
- Duplicate before major edits
- Keep naming structure consistent
Example:
AI-Support-v1
AI-Support-v2
Monitor Execution Logs
Check:
- Failure rates
- Response time
- API errors
n8n provides full execution history.
Control AI Costs
AI nodes can get expensive.
Optimize by:
- Reducing token length
- Using smaller models when possible
- Filtering before sending to AI
Add Error Handling
Use:
- Error Trigger Node
- Retry logic
- Fallback responses
Never rely on AI without guardrails.
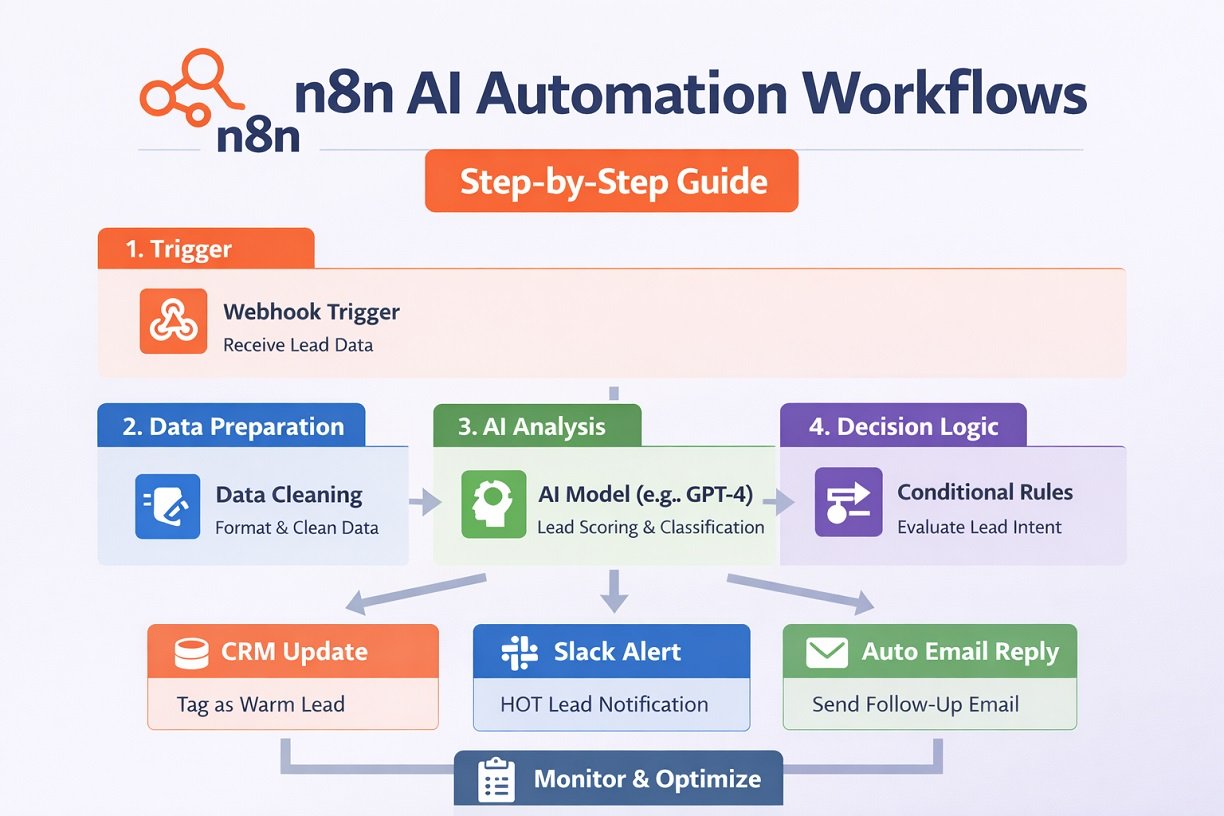
Example: Full AI Lead Qualification Workflow
Here’s a more advanced business use case:
Trigger: New website lead
↓
AI analyzes company data
↓
AI scores lead (Hot / Warm / Cold)
↓
CRM update
↓
Sales Slack notification
Many businesses send qualified leads directly into a CRM for follow-up. If you’re deciding which CRM platform works best alongside n8n, see our comparison of GoHighLevel vs HubSpot to determine the right fit for your sales automation stack. This replaces hours of manual review.
Best Practices for AI Automation in n8n
✔ Keep prompts structured
✔ Always test edge cases
✔ Separate logic from AI generation
✔ Use conditional routing
✔ Log outputs for auditing
AI is powerful. But workflow structure is what makes it reliable.
Common Mistakes to Avoid
❌ Sending raw data to AI without cleaning
❌ No fallback logic
❌ Over-automating sensitive actions
❌ Ignoring API limits
❌ Activating without testing
Final Thoughts
n8n is not just an automation tool.
It is a workflow engine that becomes extremely powerful when combined with AI.
The real advantage comes from:
- Structured logic
- Controlled AI usage
- Smart routing
- Continuous optimization
Start simple.
Build one working AI workflow.
Then expand into multi-step automation systems.
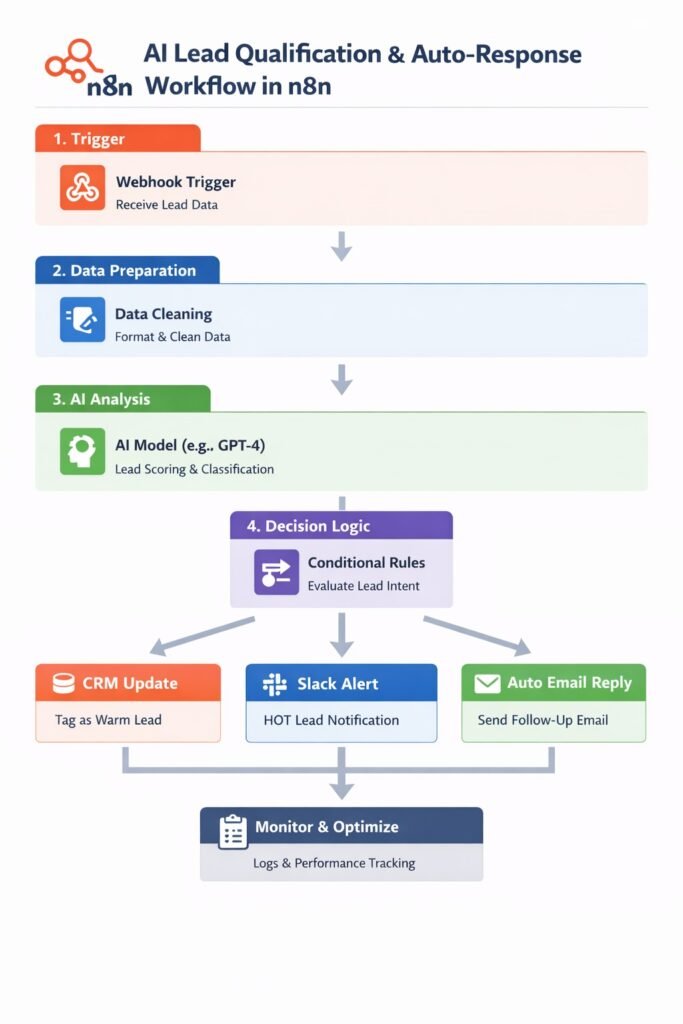
Visual Workflow Blueprint: n8n AI Automation System
Below is a clear visual-style blueprint you can follow to build a scalable AI workflow inside n8n.
This example shows a Lead Qualification + Auto-Response AI System — one of the highest-ROI automation use cases.

🧩 High-Level Architecture Diagram
[ Trigger ]
↓
[ Data Cleaning ]
↓
[ AI Analysis ]
↓
[ Conditional Logic ]
↓
┌───────────────┬───────────────┐
↓ ↓ ↓
[ CRM Update ] [ Slack Alert ] [ Auto Email ]
🔷 Full Workflow Blueprint (Node-by-Node)
1️⃣ Trigger Layer
Node: Webhook Trigger
Purpose:
- Captures form submission
- Receives JSON payload
Example Input:
{
“name”: “John Smith”,
“email”: “john@company.com”,
“company”: “ABC Logistics”,
“message”: “We need pricing for enterprise automation”
}
2️⃣ Data Preparation Layer
Node: Set / Function Node
Purpose:
- Clean text
- Remove empty fields
- Format for AI prompt
Formatted Output:
Lead Name: John Smith
Company: ABC Logistics
Inquiry: We need pricing for enterprise automation
This improves AI accuracy significantly.
3️⃣ AI Processing Layer
Node: AI Model (OpenAI / LLM provider)
Prompt Blueprint:
You are a B2B sales analyst.
Analyze this lead and classify:
1. Intent (High / Medium / Low)
2. Buying Stage (Research / Decision / Urgent)
3. Industry Type
4. Short reasoning (1 sentence)
Lead Data:
{{formatted_text}}
Expected Output:
Intent: High
Stage: Decision
Industry: Logistics
Reason: Clear pricing request suggests purchase intent.
4️⃣ Decision Routing Layer
Node: Switch / IF Node
Logic Rules:
- If Intent = High → Notify Sales Immediately
- If Intent = Medium → Add to CRM Follow-Up
- If Intent = Low → Add to Email Nurture List
Blueprint:
IF Intent == “High”
→ Slack Alert
ELSE IF Intent == “Medium”
→ CRM Tag: Warm Lead
ELSE
→ Add to Nurture List
This prevents automation mistakes.
5️⃣ Action Layer
A. CRM Update Node
- Create contact
- Add tag
- Store AI classification
B. Slack Notification Node
Message Template:
🔥 HOT LEAD ALERT
Name: {{name}}
Company: {{company}}
Intent: High
Stage: Decision
Reason:
{{AI_reason}}
C. AI Auto-Reply Email (Optional)
Second AI Node:
Prompt:
Write a short professional reply acknowledging interest.
Offer a demo call.
Keep under 120 words.
Send via:
- Gmail Node
- SMTP Node
🔷 Advanced Version (Scalable Architecture)
For agencies or SaaS businesses:
Webhook Trigger
↓
Data Cleaner
↓
AI Intent Classifier
↓
Database Log (All Leads)
↓
Switch Node
↓
┌───────────────┬───────────────┬───────────────┐
↓ ↓ ↓
High Medium Low
↓ ↓ ↓
Slack CRM Task Email Campaign
↓
Calendar Booking Link
🧠 Visual Logic Flow Summary
Think in layers:
- Input Layer → Capture data
- Preparation Layer → Clean & structure
- AI Intelligence Layer → Analyze & classify
- Decision Layer → Route smartly
- Action Layer → Execute
That is the blueprint pattern for 90% of AI workflows.
🛡️ Reliability Add-On Blueprint
To make it production-ready, add:
Error Handling Branch
IF AI Fails
→ Send fallback email
→ Log error in database
→ Notify admin
📊 Cost-Control Blueprint
Add Pre-Filter:
IF message length < 10 words
→ Skip AI
This reduces API usage significantly.
🔧 Naming Convention Blueprint
Use structured workflow names:
AI-Lead-Qualification-v1
AI-Lead-Qualification-v2
AI-Lead-Qualification-Prod
Clear naming improves scale management.
🚀 Expansion Blueprint (AI Agent Style)
You can extend into:
- AI Meeting Summaries
- AI Support Ticket Classifier
- AI Proposal Generator
- AI CRM Data Enrichment
All using the same architecture pattern.
Final Blueprint Philosophy
Automation alone creates efficiency. AI alone creates intelligence. Structured AI workflows inside n8n create predictable scalable systems.
Frequently Asked Questions (Advanced n8n AI Workflows)
What is the best way to structure prompts in n8n for consistent AI outputs?
Use a structured prompt format with clear sections such as role, task, constraints, and expected output. Avoid vague instructions and always define output format (e.g., JSON or bullet points). This reduces hallucination and improves consistency across workflow runs.
How can you prevent hallucinations in n8n AI workflows?
You can reduce hallucinations by using Retrieval-Augmented Generation (RAG), adding strict prompt constraints, limiting response scope, and validating outputs with logic nodes before taking action.
How do you handle rate limits and API failures in n8n?
Use retry logic, wait nodes, and error trigger workflows. You can also queue requests or batch them to stay within API limits. Logging failures to a database helps monitor recurring issues.
Can n8n run AI workflows in real time for high-traffic systems?
Yes, but performance depends on your setup. For high-traffic systems, use queue mode, scalable infrastructure (like Docker + Redis), and async processing to handle large volumes without delays.
What is the ideal architecture for scalable AI automation in n8n?
A scalable setup includes a trigger layer, data processing layer, AI layer, decision routing, and action layer. Adding logging, error handling, and database storage ensures reliability and long-term scalability.
Can beginners use n8n for AI workflow automation?
Yes. Beginners can use n8n Cloud to create AI workflows without coding. The visual editor makes it easy to connect AI models, APIs, and business applications.
When should you avoid using AI in an n8n workflow?
Avoid using AI for simple deterministic tasks like filtering, routing, or basic calculations. Use logic nodes instead, and reserve AI for tasks that require interpretation, generation, or classification.