n8n Website Lead Capture Workflow: Automate Form Submissions


Every website form submission represents a potential business opportunity, but manually transferring contact details from forms into spreadsheets or business systems creates unnecessary work. It can also lead to missing records, inconsistent data, and delayed responses.
An n8n website lead capture workflow connects a website form to an automated process that receives submissions, validates the data, and sends eligible records to a chosen destination. Once configured, it can help businesses collect leads more consistently without manually copying every submission.
In this guide, you’ll learn how to build a website lead capture workflow with n8n using a Webhook node, input validation, Google Sheets, and a response to the submitting visitor. You’ll also learn how to test the workflow, handle invalid submissions, reduce spam, and troubleshoot common errors.
This tutorial focuses on the initial capture stage. Lead scoring, sales-team assignment, CRM enrichment, and automated nurturing are separate processes that can be added later.
Table of Contents
What Is an n8n Website Lead Capture Workflow?
An n8n website lead capture workflow receives information submitted through a website form and processes it automatically. For example, a visitor might complete a contact form requesting information about an automation service. The form sends the submitted fields to an n8n webhook, where the workflow checks the incoming data before saving the eligible submission to Google Sheets or another supported destination.
The process can replace repetitive manual tasks such as copying names, email addresses, company details, and inquiry messages into a lead register.
What Can This Workflow Automate?
A website lead capture workflow can:
- Receive website form submissions through an n8n webhook.
- Check whether required fields are present and correctly formatted.
- Reject incomplete or malformed submissions.
- Store valid lead records in Google Sheets or a CRM.
- Return a clear success or error response to the website visitor.
- Record failures for troubleshooting and operational monitoring.
The workflow does not automatically guarantee that a submission represents a genuine prospect. Email validation can detect certain formatting errors, but additional controls are needed to identify spam, bots, and fabricated contact information.
How the Workflow Works
The basic process is:
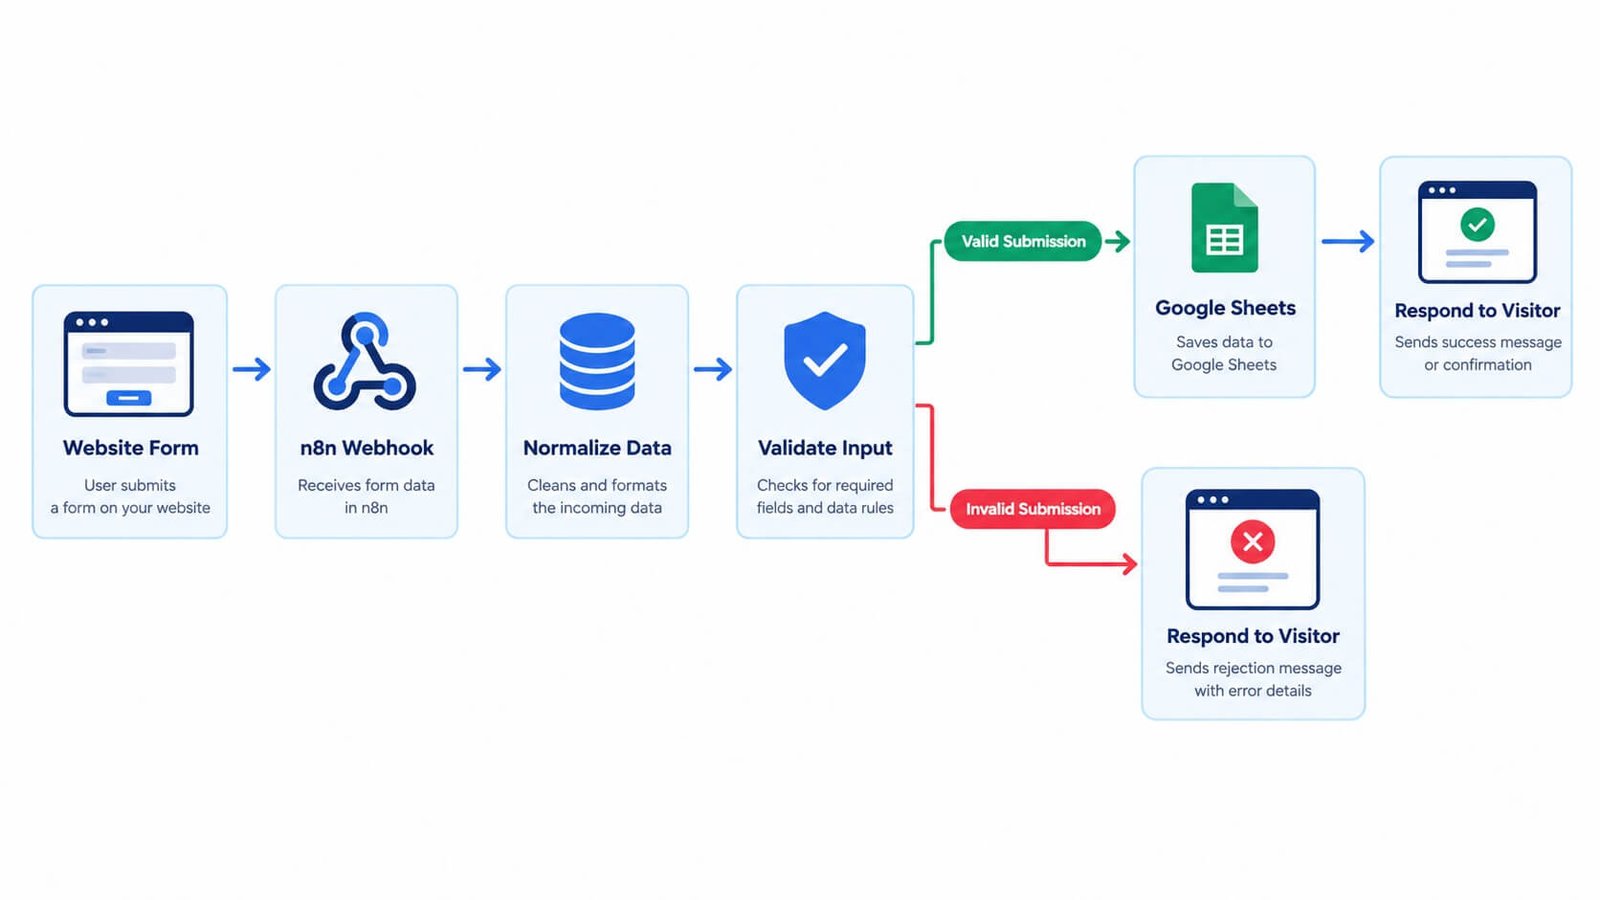
Website form → n8n Webhook → Validate input → Check submission → Save lead → Return response
Each component has a defined responsibility.
| Component | Purpose |
| Website form | Collects the visitor’s information |
| Webhook | Receives the HTTP request |
| Edit Fields or Code node | Normalizes or prepares incoming values |
| IF node | Checks required fields and basic validity |
| Google Sheets or CRM node | Stores eligible submissions |
| Respond to Webhook | Returns an appropriate HTTP response |
For the first version, Google Sheets is a convenient destination because it makes submissions easy to inspect. You can replace it with a CRM or database later without changing the core idea of receiving and validating the form data.
Tools and Requirements
Before building the workflow, prepare:
- An n8n instance with permission to create and activate workflows.
- A website form that can submit data to a webhook.
- A Google account if you plan to store submissions in Google Sheets.
- A test email address and a few sample form submissions.
You do not need an AI model or a paid AI API for this implementation. If you use WordPress, your form plugin must support sending submissions to a webhook or an equivalent integration.
A custom HTML form can also submit to an n8n webhook, provided the request method, encoding, and response handling are configured correctly.
Step 1: Create the Destination Spreadsheet
Create a Google Sheet named Website Lead Submissions. Add the following column headers:
| Column | Purpose |
| Submission ID | Identifies the submission |
| Submitted At | Records when it was received |
| Name | Stores the visitor’s name |
| Stores the submitted email address | |
| Company | Stores the company name, if provided |
| Inquiry | Records the visitor’s message |
| Consent Status | Records the relevant consent or contact preference |
| Processing Status | Indicates whether the record was accepted or needs review |
Keep the fields limited to information your business genuinely needs. If you intend to collect marketing consent, use a separate, clearly worded checkbox rather than assuming that submitting a contact form automatically authorizes promotional emails.
For a production system, generate a unique submission ID and define how duplicate submissions will be handled.
Step 2: Create an n8n Webhook
Open n8n and create a new workflow called Website Lead Capture. Add a Webhook node and configure the incoming request. Recommended starting settings:
- HTTP Method: POST
- Path: website-lead-capture
- Authentication: Choose an appropriate mechanism for your integration.
- Response: Use the Respond to Webhook node for explicit control over the response.
The exact settings available can vary with your n8n version.
Test URL vs. Production URL
The Webhook node provides separate test and production URLs. Use the test URL while building and testing the workflow. Test requests generally require the node to be listening for a test event.
Once the workflow is configured, saved, and activated, use the production URL in your website form integration. Confirm that the production URL works after activation rather than relying exclusively on successful test executions.
Do not publish private webhook credentials or unrestricted test endpoints in your article screenshots or public documentation. For more details, consult the official n8n Webhook documentation.
Step 3: Connect Your Website Form
Your form must send an HTTP POST request to the webhook URL. For a WordPress website, there are two common approaches:
- Use a form plugin with a webhook integration.
- Use a custom form that sends a POST request to the n8n endpoint.
A form plugin is often easier to maintain because it can handle field validation, user-facing messages, and submission states without requiring custom JavaScript.
Example Form Fields
A basic lead capture form might include:
- Name — required.
- Business email — required.
- Company — optional.
- What do you need help with? — required.
- Permission to receive marketing updates — optional and separate from the service inquiry.
Use descriptive field names that are consistent with the fields expected by your n8n workflow. For example, the webhook might receive a JSON payload like this:
{
“name”: “Alex Morgan”,
“email”: “alex@example.com”,
“company”: “Example Agency”,
“inquiry”: “I want to automate our website lead intake”
}
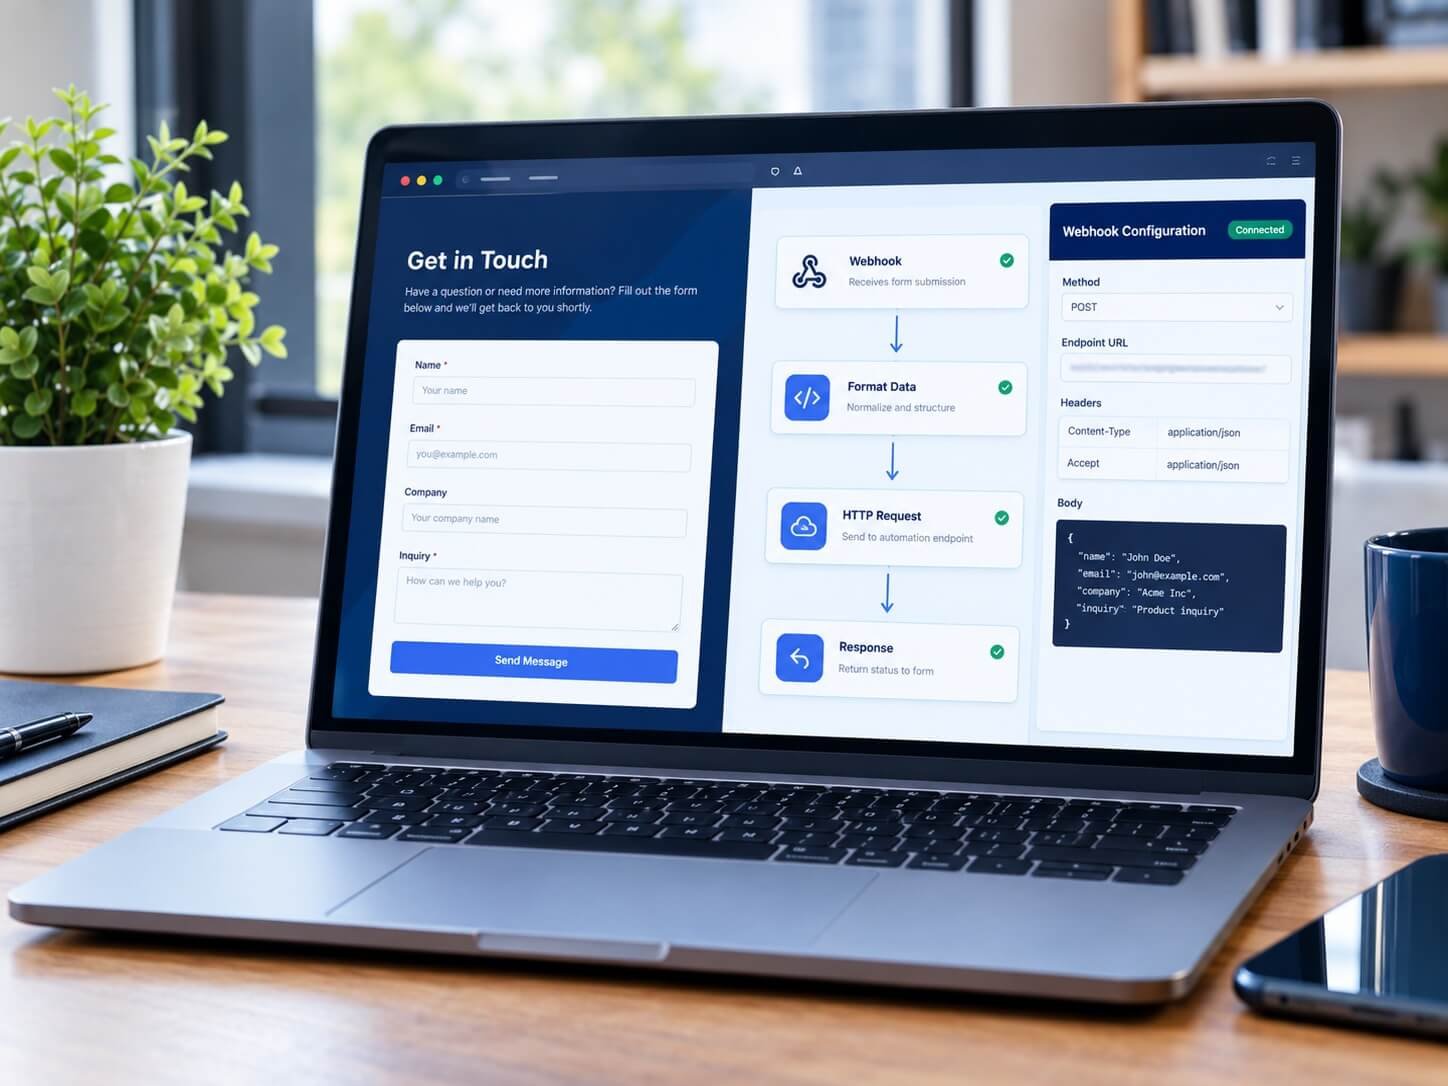
This is illustrative test data, not a real lead. The actual incoming structure depends on your form integration. Some plugins send JSON, while others use form-encoded data or wrap submitted fields inside a body object. Inspect a real test execution and map the fields based on the payload n8n actually receives.
Important: Handle Form Responses Correctly
If your form sends data directly from a browser to n8n, browser security rules such as CORS may affect the request or the ability to read the response. A standard HTML form submission and a JavaScript fetch() request do not behave identically.
Use a supported form integration or configure the browser request and webhook response appropriately. If the form and webhook are on different origins, test the complete submission flow in a real browser rather than assuming that a successful n8n test proves the website integration works.
Step 4: Inspect and Normalize the Incoming Data
After the Webhook node, add an Edit Fields node to prepare the data. Map the incoming fields to consistent names such as:
- name
- company
- inquiry
Trim unnecessary whitespace from text fields and normalize email addresses for comparison. Preserve the original submitted values where needed for audit or troubleshooting, subject to your data-retention policy.
Be careful with field paths. If the webhook receives a payload inside the body, your expressions will differ from those for a payload where the fields appear at the top level. Use a test submission to verify each mapping before continuing.
Why Normalize Data?
Consider these example submissions:
- Alex Morgan
- alex@example.com
- A blank company field.
Trimming whitespace and consistently handling optional values can prevent avoidable formatting problems in downstream systems. However, normalization should not silently change the meaning of a visitor’s message or erase information needed to process the inquiry.
Step 5: Validate the Submission
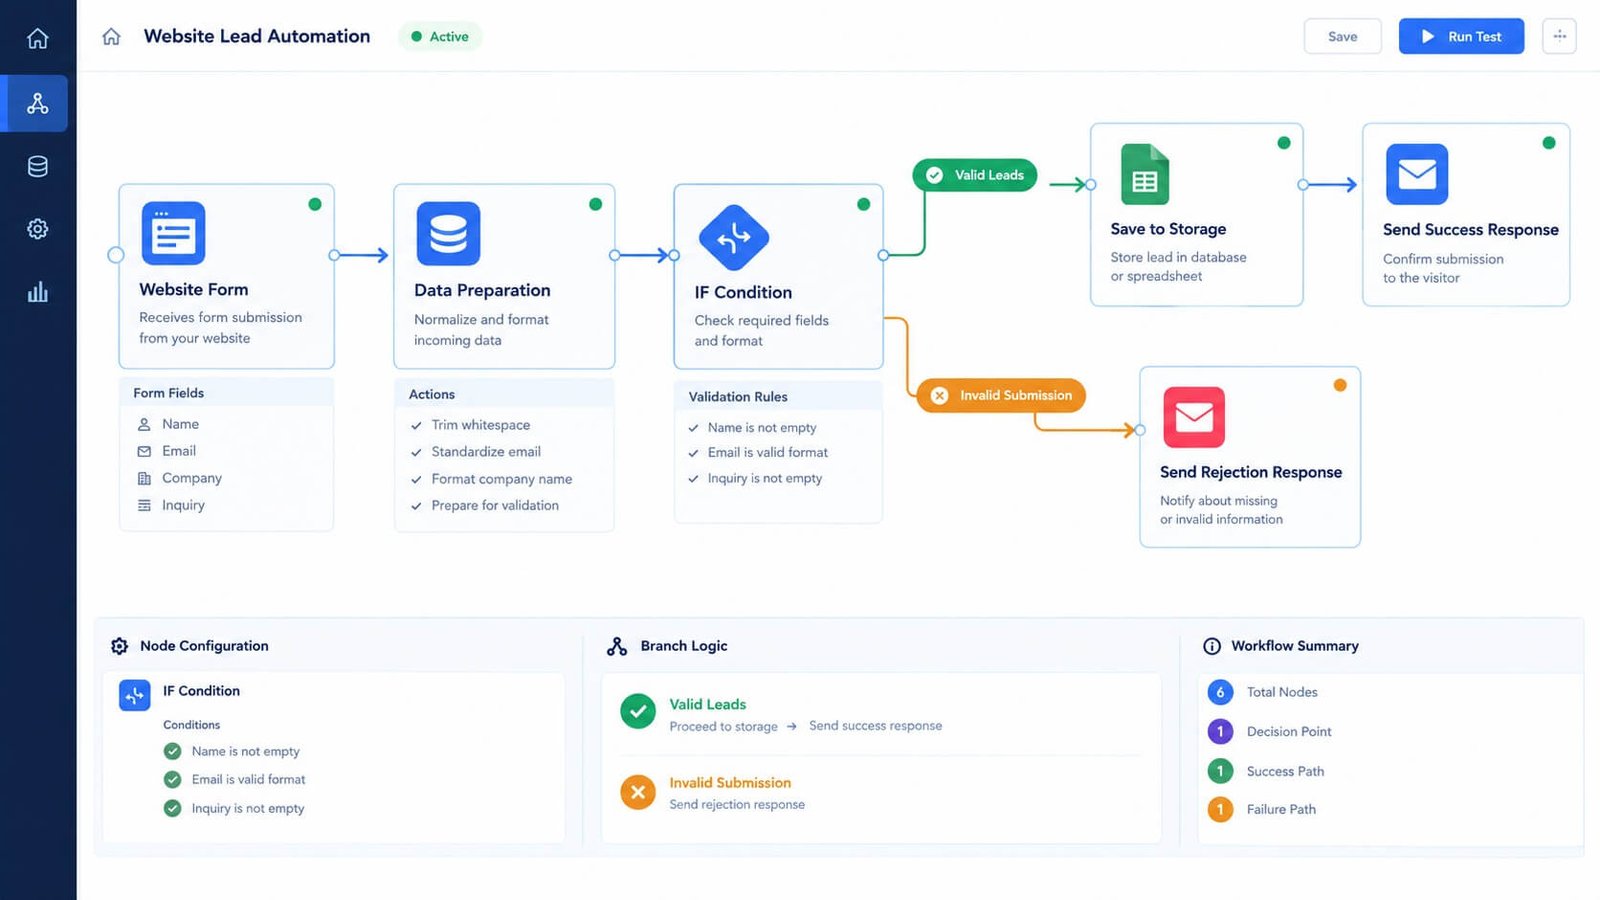
Add an IF node to check the incoming values before writing anything to the destination. At minimum, check that:
- The name is present if your form requires it.
- The email field is present and has a plausible email format.
- The inquiry is present if the visitor is required to describe their request.
- Text fields fall within sensible length limits.
- The payload has the expected structure.
Route valid submissions to the storage branch and invalid submissions to a rejection or error-handling branch.
An email-format check doesn’t prove an address exists or belongs to the person who submitted it. If address ownership matters, use an appropriate verification process.
Also avoid trusting client-side validation alone. A visitor or bot can send a request directly to a public webhook without using your website form.
Add Basic Spam Protection
A publicly accessible webhook can receive automated or malicious requests. Depending on your form setup, consider:
- CAPTCHA or another suitable bot-protection mechanism.
- Server-side rate limiting.
- Request-size and field-length limits.
- Honeypot fields supported by your form integration.
- Authentication or signed requests where the integration supports them.
- Monitoring for repeated or suspicious submissions.
A secret URL by itself should not be treated as strong authentication. Never embed a private API key in browser-side JavaScript, where visitors can inspect it.
Step 6: Save Valid Leads to Google Sheets
Add a Google Sheets node to the valid branch of your workflow. Select the correct spreadsheet and worksheet, then configure the node to append a new row. Map the validated fields:
| Spreadsheet field | Incoming value |
| Submission ID | Generated unique identifier |
| Submitted At | Server-side receipt timestamp |
| Name | Validated name |
| Normalized email | |
| Company | Validated company value |
| Inquiry | Validated inquiry |
| Consent Status | Recorded consent or preference, if applicable |
| Processing Status | Accepted |
Use a timestamp generated by the workflow or a trusted server-side source rather than relying on a timestamp supplied by the visitor.
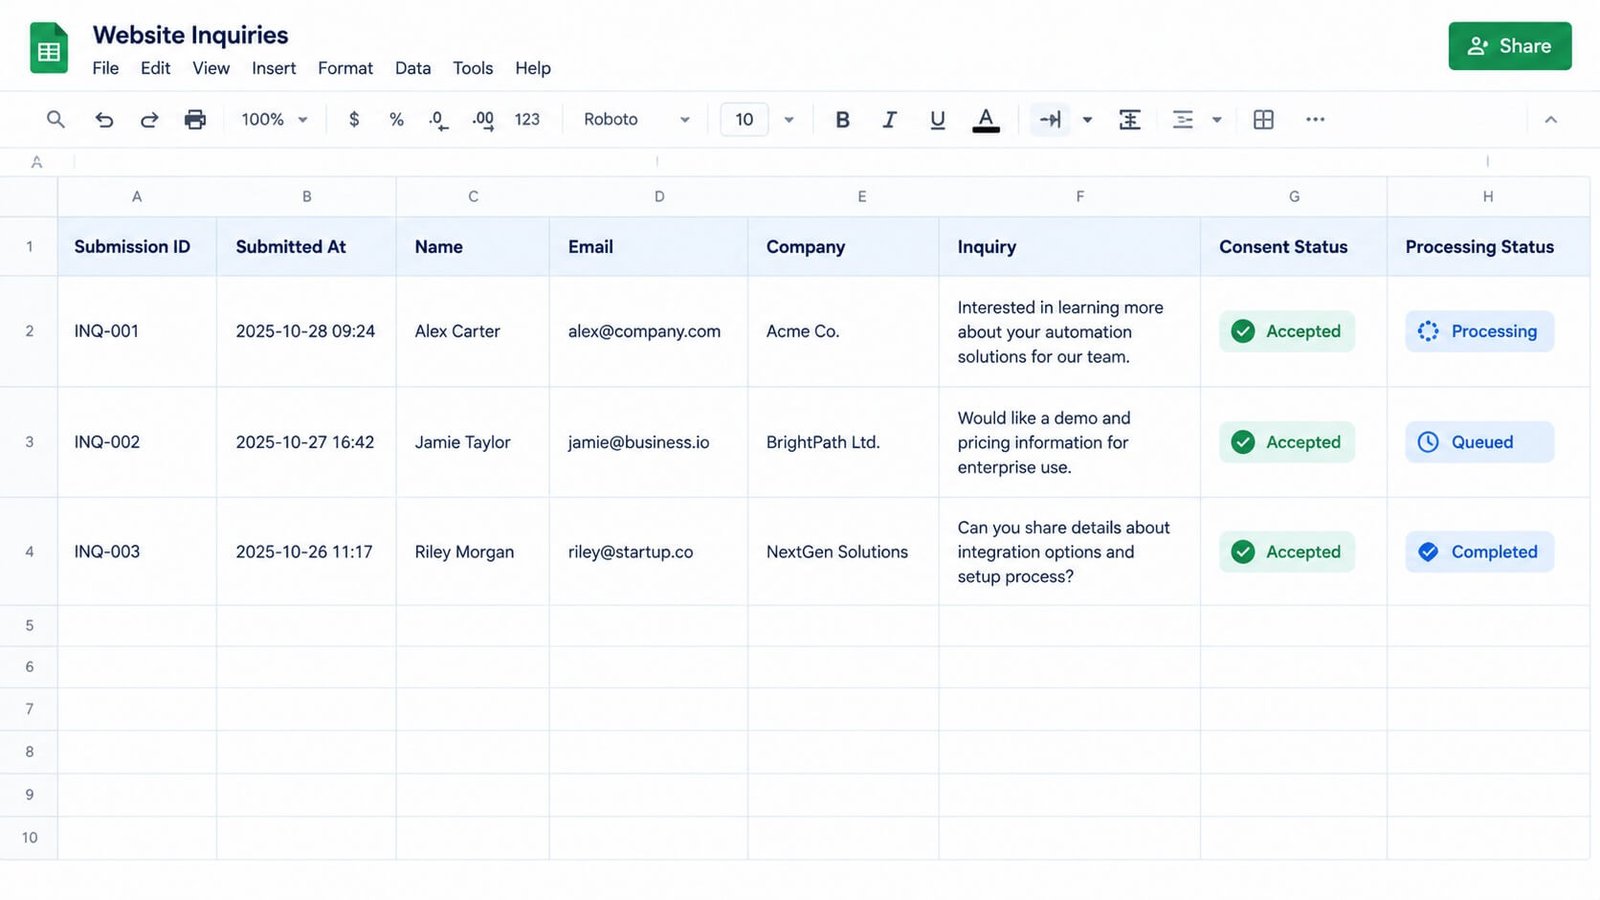
For a production workflow, decide how to handle repeated submissions. Two submissions from the same email address might be accidental duplicates, or they might represent separate inquiries.
Do not automatically discard them based on email address alone without a defined business rule. For larger lead volumes, a CRM or database may offer better querying, access control, and duplicate management than a spreadsheet.
Step 7: Return a Clear Response to the Website Visitor
After the storage operation succeeds, add a Respond to Webhook node. Configure the Webhook node’s response mode to use this node, then return an appropriate success response.
For example:
{
“success”: true,
“message”: “Your inquiry has been received.”
}
Use an appropriate successful HTTP status, such as 200 OK or 201 Created, according to your integration. If validation fails, return a suitable client-error status and a message explaining that the submission needs correction. If the storage system fails, return an appropriate error response rather than falsely claiming the lead has been saved.
Avoid exposing internal stack traces, credentials, database details, or other sensitive implementation information in responses.
Avoid False Success Messages
The website should not tell visitors that their inquiry was received successfully before the workflow has confirmed that the required storage step succeeded.
If you return the response immediately after the webhook receives a request, a later Google Sheets failure could occur after the visitor has already seen a success message. Configure the response sequence to match the reliability you need.
For a more resilient implementation, you can store submissions in a durable queue or database before acknowledging receipt, then process downstream integrations separately.
Step 8: Add Error Handling
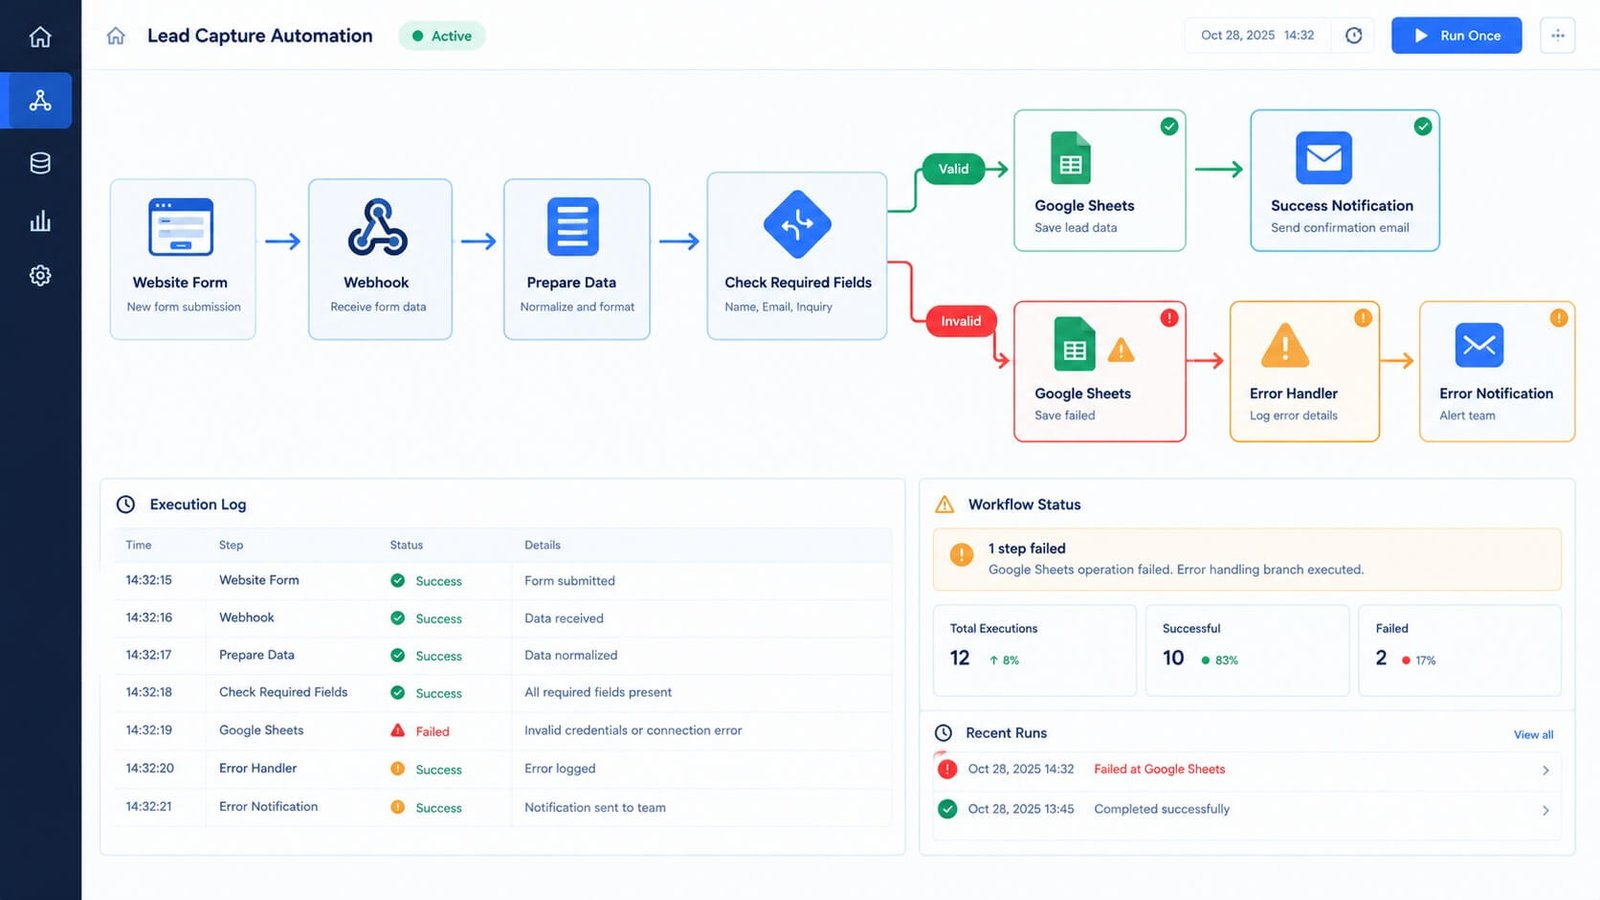
Connect an error-handling path for failures in the validation or storage stages. Examples include:
- Google credentials have expired.
- The destination spreadsheet has been deleted or renamed.
- The webhook payload is missing required fields.
- The destination service temporarily rejects a request.
- A node encounters an unexpected data structure.
Log enough information to diagnose the problem without unnecessarily storing sensitive visitor data. For important failures, send an internal notification or use an n8n error workflow. If a storage request times out, check whether the destination accepted the record before blindly retrying it. Otherwise, the retry could create a duplicate.
For production use, consider a unique submission identifier that allows the workflow to detect whether a record has already been processed.
Step 9: Test the Complete Workflow
Before connecting the workflow to live traffic, submit several test records.
| Test case | Expected result |
| Valid name, email, and inquiry | Submission is stored and success is returned |
| Missing required email | Submission is rejected |
| Invalid email format | Submission is rejected |
| Optional company field is blank | Submission is handled correctly |
| Unexpected payload structure | Request is rejected or safely handled |
| Google Sheets credential fails | Error is logged and success is not falsely reported |
| Same submission is retried | Duplicate handling follows your defined rule |
| Spam-like request is submitted | Applicable validation or protection blocks or flags it |
| Production URL is called after activation | Live integration works as expected |
Test the workflow from the actual website or form integration, not only through n8n’s test interface. This helps reveal differences in request formats, CORS behavior, field mappings, and response handling.
Once the tests pass, activate the workflow and begin with a small number of real submissions. Check execution history and destination records to confirm that the system behaves as intended.
Security and Privacy Considerations
Website lead capture introduces responsibilities beyond connecting nodes. Before using the workflow with real visitors:
- Collect only the information needed for the stated purpose.
- Explain how submitted information will be used.
- Apply the appropriate consent and contact rules for your jurisdiction and intended communications.
- Restrict access to lead records and workflow credentials.
- Use HTTPS for public website-to-webhook traffic.
- Set sensible retention and deletion rules.
- Review who can access execution logs and error details.
- Protect public endpoints against abuse and excessive requests.
If the workflow captures sensitive information, a basic spreadsheet may not be an appropriate destination. Choose storage and access controls that match the type of data and the business’s obligations. For broader automation-security practices, see the AI Workflow Security guide.
Common Problems and How to Fix Them
The webhook receives no data
Check that the website uses the correct URL and HTTP method. Confirm that the form sends data in the expected format and that the workflow is listening on the test URL or activated for the production URL.
The fields appear empty in n8n
Inspect the Webhook node’s output. The submitted fields may be nested under body, or the form may use different field names than the workflow expects.
The form shows an error even though the lead is saved
Check the response mode, HTTP status, and response body. Browser security rules or a response format the form does not expect may cause the website to report failure even when storage succeeded.
Google Sheets does not receive a row
Verify the credential, spreadsheet ID, worksheet selection, column mappings, and execution output. Confirm that the validation branch actually reaches the Google Sheets node.
Spam submissions are increasing
Review your form’s bot protection, rate limiting, validation, and endpoint access controls. A webhook is an integration endpoint, not a complete spam-filtering system.
Duplicate records appear
Check whether the form resubmits requests after a timeout and whether n8n retries failed executions. Introduce a unique submission ID and an explicit deduplication policy suitable for your use case.
FAQs About n8n Website Lead Capture Workflow
Can n8n capture leads from a WordPress website?
Yes. A WordPress form plugin that supports webhooks can send submissions to n8n. You can also build a custom integration, provided the request format, endpoint security, and response handling are configured correctly.
Do I need an AI API for website lead capture?
No. Webhooks, conditional logic, data mapping, and storage nodes can handle basic capture without an AI API. AI may be useful in a separate workflow for tasks such as classifying inquiry text, but it is not necessary for receiving a form submission.
Can I send captured leads directly to a CRM?
Yes. Replace or extend the Google Sheets storage step with the relevant CRM integration. Keep this workflow responsible for receiving and validating submissions, and handle more advanced CRM synchronization in a separate, clearly defined process where practical.
Is an n8n webhook safe to expose publicly?
A public webhook can be appropriate for receiving website submissions, but it needs suitable protections. Use HTTPS, validate incoming data, limit abuse, secure credentials, and avoid treating an obscure URL as sufficient authentication.
Can this workflow prevent duplicate leads?
It can reduce duplicates when you implement a reliable identifier and an explicit deduplication rule. A basic append-row operation alone does not guarantee duplicate prevention, especially when requests are retried or processed concurrently.
Conclusion
An n8n website lead capture workflow provides a practical way to receive form submissions, validate incoming information, and send eligible records to Google Sheets or a CRM. The most reliable implementation is not simply a webhook connected to a spreadsheet. It includes clear field mappings, server-side validation, sensible spam protection, appropriate response handling, error logging, and testing of the complete website integration.
Start with a simple form and a small set of test records. Once the capture process is reliable, you can connect it to other business systems without making the initial workflow unnecessarily complicated. The goal is a dependable entry point for your lead-management process: handle every accepted submission predictably, make failures visible, and ensure visitors receive an accurate response.





One Comment