How to Build an Automated Email Processing & Reply Workflow with n8n

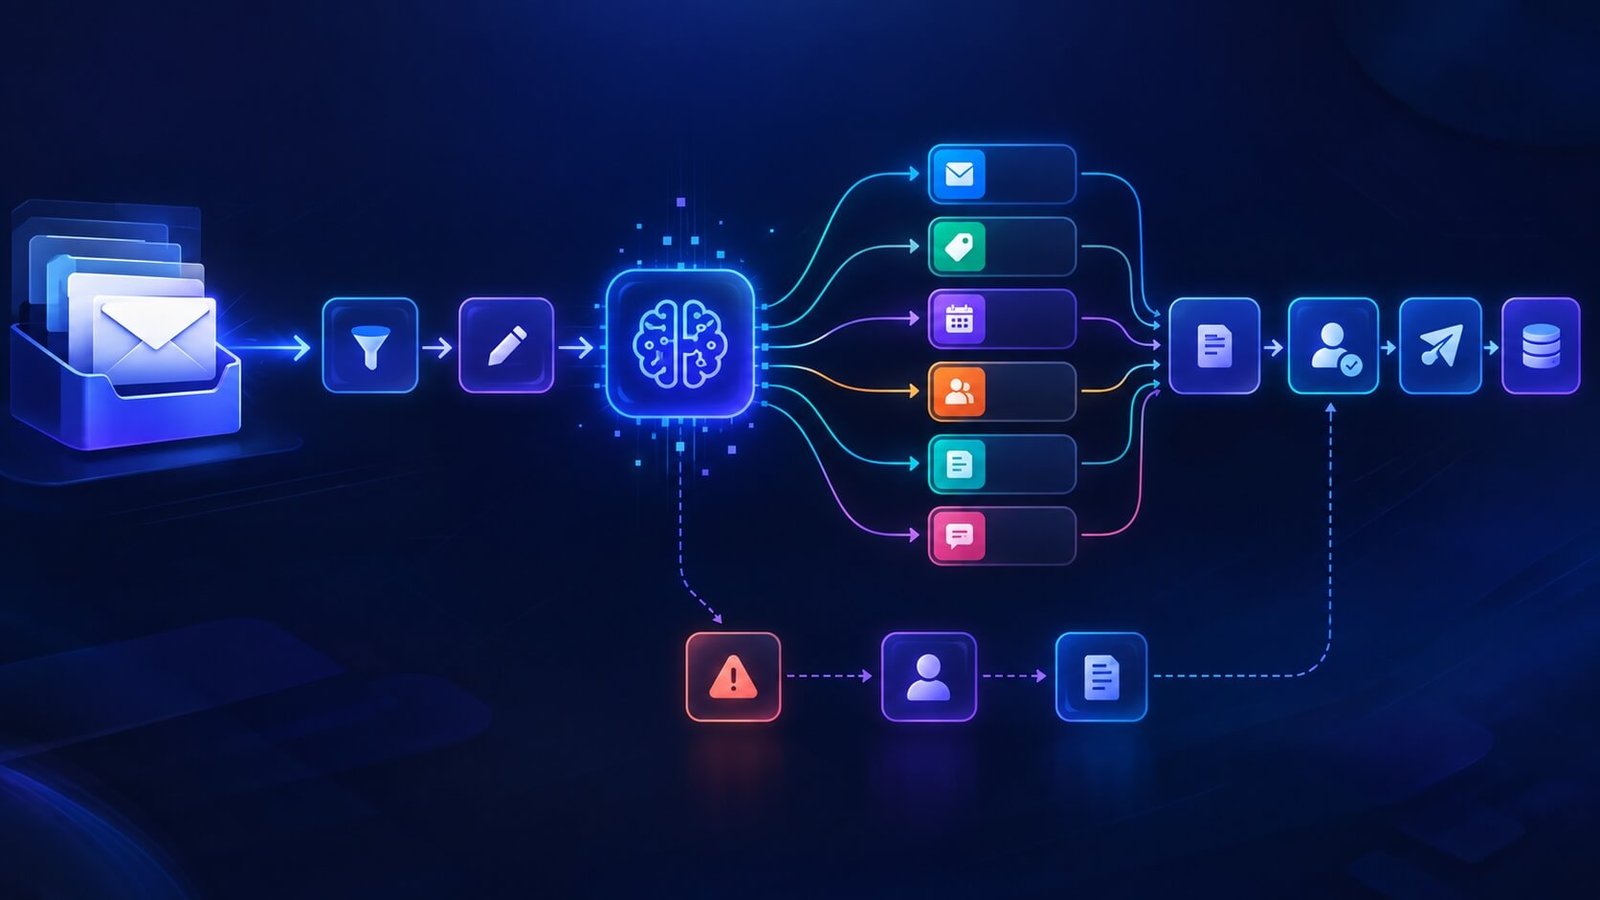
Businesses spend countless hours reading, sorting, forwarding, and responding to repetitive emails. An n8n AI email automation workflow can handle much of this work automatically by connecting your email inbox with AI, business rules, and other applications.
Instead of manually reviewing every incoming message, you can build a workflow that receives an email, analyzes its content, identifies its intent, extracts important information, routes it to the right destination, and prepares an appropriate reply.
This guide shows how to build an n8n AI email automation workflow and how to make it reliable enough for real-world business use.
What Is n8n AI Email Automation?
n8n AI email automation combines n8n’s workflow automation capabilities with an AI model to process incoming and outgoing email.
A basic workflow can look like this:
New Email → Extract Content → AI Analysis → Classify → Route → Generate Reply → Human Approval → Send → Log
The important difference between a simple email automation and an AI-powered workflow is that AI can interpret the content rather than relying entirely on fixed rules. For example, a traditional automation might look for the word “pricing” in an email.
An AI-powered workflow can understand that:
“Could you send me the cost for your professional plan and let me know whether annual billing is available?”
It is a pricing-related request, even if the exact keywords or wording vary. This makes the workflow more flexible when handling large volumes of business email.
What Can an n8n AI Email Workflow Automate?
A well-designed workflow can automate several repetitive email-processing tasks.
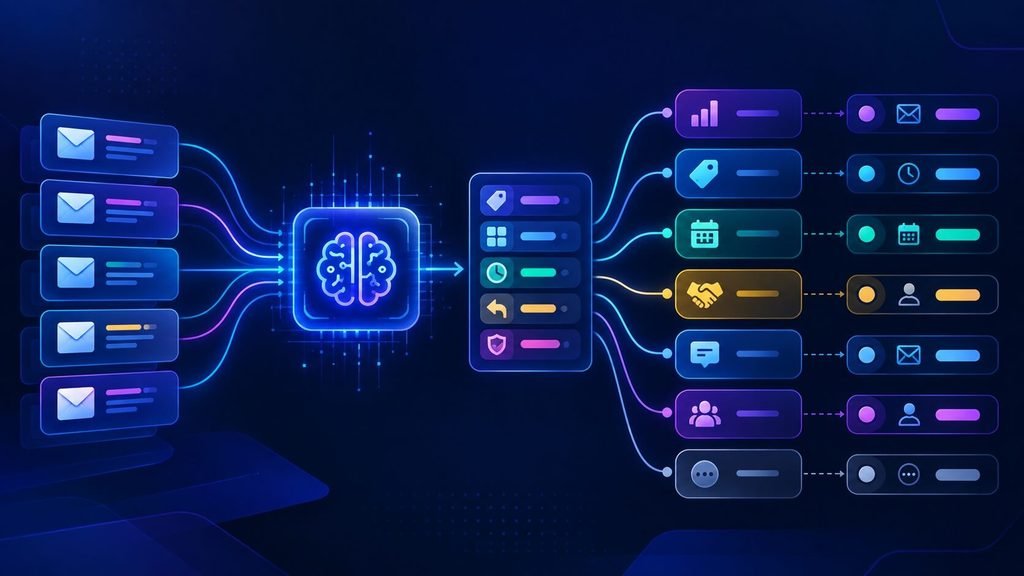
Email classification
AI can categorize incoming messages based on their content.
For example:
- Sales inquiry
- Pricing request
- Meeting request
- General inquiry
- Internal message
- Partnership inquiry
- Billing-related message
- Spam or low-priority email
Information extraction
The AI can extract structured information from unstructured messages. Depending on the use case, this might include:
- Sender name
- Company
- Email address
- Request type
- Product or service
- Important dates
- Meeting preferences
- Urgency
- Follow-up requirements
Email routing
Once an email has been classified, n8n can route it to the appropriate workflow, team, CRM, spreadsheet, database, or communication system.
Reply drafting
AI can generate a response based on the email content and instructions supplied in the workflow. For sensitive or important messages, the response can be sent to a human for approval before it reaches the customer or prospect.
Email logging
The workflow can also record processed messages and their results, creating a useful audit trail for the automation.
How the n8n AI Email Automation Workflow Works
A practical workflow can be divided into eight stages:
- Email trigger
- Content extraction
- Email cleanup
- AI classification
- Information extraction
- Routing
- AI reply generation
- Approval, sending, and logging
The exact n8n nodes will depend on your email provider and the other applications you want to connect. The overall logic, however, remains similar.
Step 1: Trigger the Workflow When a New Email Arrives
The first step is detecting a new incoming email. Depending on your setup, you can connect n8n with an email service such as Gmail or another supported email system. The trigger should provide the information your workflow needs, such as:
- Sender
- Recipient
- Subject
- Message body
- Timestamp
- Thread information
- Attachments or attachment metadata
Once the trigger fires, n8n passes the email data to the next stage.
Why the trigger matters
You don’t want the AI processing every message blindly. For example, you might first filter out:
- Automated notifications
- Marketing newsletters
- Known system emails
- Internal alerts
- Messages that don’t require processing
This can reduce unnecessary AI processing and keep the workflow focused on messages that actually require action.
Step 2: Extract and Clean the Email Content
Email data often contains HTML formatting, signatures, quoted replies, tracking information, and other content that isn’t useful to the AI. Before sending the message to an AI model, clean and structure the relevant information.
A useful input might look like:
From: Jane Smith
Company: Example Company
Subject: Request for pricing information

Email:
Hi,

We're evaluating your service for a team of 25 people.
Could you send us your pricing and explain whether you offer
annual billing?

Thanks,
Jane
This gives the AI a much cleaner context than passing an entire raw email object.
Why cleaning matters
Cleaner inputs generally make it easier for the AI to:
- Identify intent
- Extract useful information
- Produce consistent output
- Avoid responding to irrelevant quoted content
- Follow the workflow’s instructions
You should also be careful with email attachments. If attachments need to be processed, treat that as a separate workflow stage rather than assuming every file should automatically be sent to an AI model.
Step 3: Use AI to Classify the Email
After cleaning the email, send the relevant content to an AI model for classification. The goal isn’t necessarily to generate a response yet. First, determine the email’s purpose and what should happen next. For example, you could ask the model to return a structured result such as:
{
  "category": "pricing",
  "priority": "medium",
  "requires_reply": true,
  "requires_human_review": true
}
Your workflow can then use these fields to make routing decisions.
Example classification categories
You could create categories such as:
| Category | Typical action |
|---|---|
| Sales | Route to sales workflow |
| Pricing | Draft pricing response |
| Meeting | Extract scheduling information |
| General | Generate general response |
| Partnership | Route to business development |
| Internal | Send to internal workflow |
| Spam | Archive or ignore |
The categories should reflect your actual business processes rather than trying to cover every possible email type.
Step 4: Extract Important Information
Classification tells you what an email is about. Information extraction tells you what useful data is inside the message. For example, the AI could identify:
{
  "name": "Jane Smith",
  "company": "Example Company",
  "request": "Pricing for 25 users",
  "billing_preference": "Annual",
  "intent": "Pricing inquiry"
}
You can then pass these fields into other n8n nodes.
For example:
Email → AI extraction → CRM → Sales notification
This becomes much more powerful than simply generating an email response. Sales-related emails can also feed downstream processes such as a sales pipeline tracker, allowing important conversations to become trackable sales activities.
Step 5: Route the Email Automatically
Once the message has been classified, n8n can determine what happens next.
For example:
Pricing inquiry
→ Generate approved pricing response
Meeting request
→ Extract scheduling information
→ Send to scheduling workflow
Sales inquiry
→ Send information to CRM
→ Notify sales team
General inquiry
→ Generate general response
Spam
→ Apply appropriate email action
This is where n8n’s workflow logic becomes particularly useful. Instead of building one enormous automation, you can create clear branches for different email types.
Complete n8n AI Email Automation Workflow Build
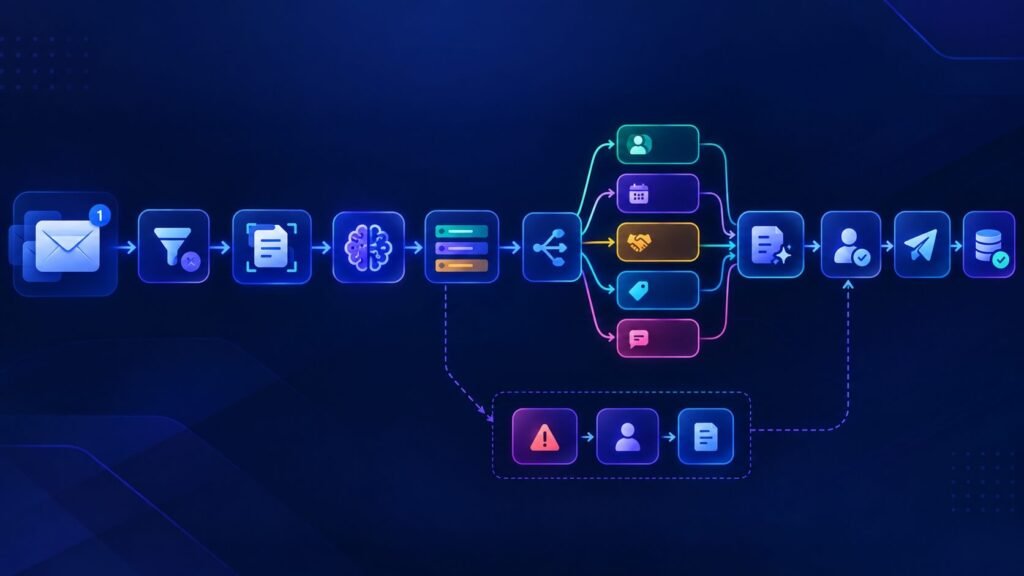
Now let’s build the workflow step by step. The finished automation will follow this structure:
Gmail Trigger → Filter → Edit Fields → AI Email Classifier → Structured Output Parser → Switch → AI Reply Generator → Approval → Send Email → Log Result
The workflow is designed to handle general business emails rather than replacing a dedicated customer-support system.
For example:
New email
↓
Remove irrelevant messages
↓
Extract email information
↓
AI identifies intent
↓
Route according to category
↓
Generate an appropriate response
↓
Human approval
↓
Send reply
↓
Record the result
If your primary goal is automating support tickets and customer conversations rather than general business email processing, see our customer support automation workflow.
Workflow Architecture
Here’s the complete node structure:
┌─────────────────────┐
│    Gmail Trigger    │
│   New Email Arrives │
└──────────┬──────────┘
           ↓
┌─────────────────────┐
│       Filter        │
│ Remove unwanted     │
│ messages            │
└──────────┬──────────┘
           ↓
┌─────────────────────┐
│     Edit Fields     │
│ Clean email data    │
└──────────┬──────────┘
           ↓
┌─────────────────────┐
│   AI Classifier     │
│ Intent + Priority   │
└──────────┬──────────┘
           ↓
┌─────────────────────┐
│ Structured Output   │
│ Parse AI response   │
└──────────┬──────────┘
           ↓
┌─────────────────────┐
│       Switch        │
│ Route by category   │
└─────┬─────┬─────┬───┘
      │     │     │
      ↓     ↓     ↓
   Sales  Meeting General
      │     │     │
      └─────┼─────┘
            ↓
┌─────────────────────┐
│  AI Reply Generator │
│ Create draft reply  │
└──────────┬──────────┘
           ↓
┌─────────────────────┐
│   Human Approval    │
│ Review before send  │
└──────────┬──────────┘
           ↓
┌─────────────────────┐
│     Send Email      │
│    Gmail / Email    │
└──────────┬──────────┘
           ↓
┌─────────────────────┐
│      Log Result     │
│ Sheets / DB / CRM   │
└─────────────────────┘
Node 1: Gmail Trigger
The first node watches for incoming email. Add a Gmail Trigger node and configure it to monitor the inbox for new messages. The trigger should provide information such as:
- Sender email
- Sender name
- Subject
- Email body
- Message ID
- Thread ID
- Received date
- Attachments, when applicable
Your exact trigger configuration can vary depending on your email provider.
Why start with an email trigger?
The trigger turns the inbox into the entry point for the automation. Instead of someone manually checking every message, n8n starts processing the email as soon as it meets the trigger conditions.
Node 2: Filter Unwanted Emails
Don’t send every email directly to an AI model. Add an IF node after the trigger. Use it to eliminate messages that shouldn’t enter the AI workflow.
For example, you might filter:
- Automated notifications
- Internal system alerts
- Marketing newsletters
- Known automated senders
- Emails from blocked addresses
A simple condition could check the sender or subject.
For example:
From does not contain:
no-reply@
You can create additional conditions as your workflow becomes more mature.
Recommended logic
New Email
   ↓
Is this an email we need to process?
   ↓
YES → Continue
NO  → Stop / Archive / Separate workflow
This prevents unnecessary processing and reduces noise.
Node 3: Edit Fields
Next, add an Edit Fields node to create a clean data structure. Instead of passing the entire Gmail response into every subsequent node, create only the fields your workflow needs.
For example:
sender_name
sender_email
subject
email_body
message_id
thread_id
received_at
You can map these values from the trigger output using n8n expressions.
For example:
Sender:
{{$json.from}}

Subject:
{{$json.subject}}

Body:
{{$json.textPlain}}
The exact field names depend on the email trigger’s returned data, so inspect the output of your trigger and select the corresponding fields.
Why use an Edit Fields node?
It gives the rest of the workflow a predictable data structure. That becomes particularly useful when you later change your email provider or add additional processing steps.
Node 4: AI Email Classifier
Now we give the email to an AI model. Add an AI model node or the appropriate AI integration available in your n8n setup. The purpose of this step is classification, not writing the final email.
The AI should determine:
- What the email is about
- What action is required
- How urgent it is
- Whether a reply is necessary
- Whether human review is required
Use a structured prompt such as:
You are an email classification assistant.

Analyze the business email provided below.

Classify the email into exactly one of these categories:

sales
pricing
meeting
partnership
general
internal
spam
other

Also determine:

- priority
- intent
- whether a reply is required
- whether human review is required

Do not invent information.

Return the result in the requested structured format.

EMAIL:

From: {{$json.sender_name}}
Email: {{$json.sender_email}}
Subject: {{$json.subject}}

{{$json.email_body}}
Node 5: Structured Output Parser
AI responses should be predictable before n8n uses them for routing. Use a Structured Output Parser or equivalent structured-output mechanism available in your n8n configuration.
The desired structure could be:
{
  "category": "pricing",
  "priority": "medium",
  "intent": "The sender wants current pricing information",
  "requires_reply": true,
  "requires_human_review": true
}
You can define the expected fields as:
category: string
priority: string
intent: string
requires_reply: boolean
requires_human_review: boolean
Why structured output matters
Without structured output, an AI might return:
This appears to be a pricing-related email. It seems moderately important and probably needs a response.
That’s difficult for a workflow to process reliably. Structured output gives n8n predictable values it can use for routing.
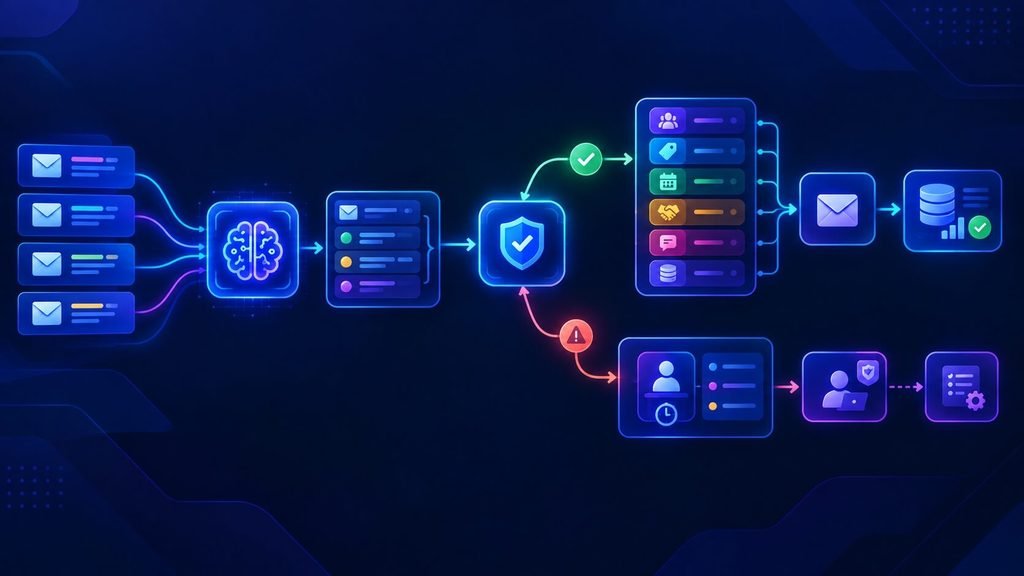
Node 6: Switch by Email Category
Now add a Switch node. The Switch node decides where the email should go based on the AI classification. Use the category field returned by the AI.
Create routes such as:
pricing
sales
meeting
partnership
general
internal
spam
other
Your workflow now becomes:
                AI Classification
                       │
                       ↓
                    Switch
          ┌────────────┼────────────┐
          ↓            ↓            ↓
        Sales       Pricing       Meeting
          │            │            │
          ↓            ↓            ↓
       Response      Response     Response
This is one of the most important parts of the workflow because the same response shouldn’t be generated for every type of email.
Node 7: Create the AI Reply
After routing, connect the relevant branches to an AI reply-generation step. The prompt should be more specific than the classification prompt.
For example:
You are an assistant drafting business email responses.

Write a concise, professional response to the email below.

Rules:

1. Do not invent pricing, product information, policies,
   availability, guarantees, or commitments.

2. Use only the approved business information supplied
   in this workflow.

3. If required information is missing, do not guess.

4. Keep the response clear and helpful.

5. Do not mention that an AI generated the response.

6. Return only the email body.

EMAIL:

From: {{$json.sender_name}}
Subject: {{$json.subject}}

{{$json.email_body}}
For a pricing branch, you could provide approved pricing information to the model. For a meeting branch, you could provide scheduling rules. However, for a general inquiry, you could use a more general business-response prompt.
Node 8: Add Approved Business Information
This is an important improvement over a simple AI email generator. Don’t expect the AI to know your current business information. Instead, give it approved information from a trusted source.
For example:
Company Information:

Business: WorkflowAISuite

Product:
AI-powered workflow automation systems.

Approved response:
Use the current product information provided by the workflow.

Important:
Never invent pricing or product features.
This information could come from:
- Edit Fields
- Google Sheets
- Database
- CRM
- Knowledge source
- API
- Another n8n workflow
The important principle is:
AI should generate the response from trusted information rather than inventing business facts.
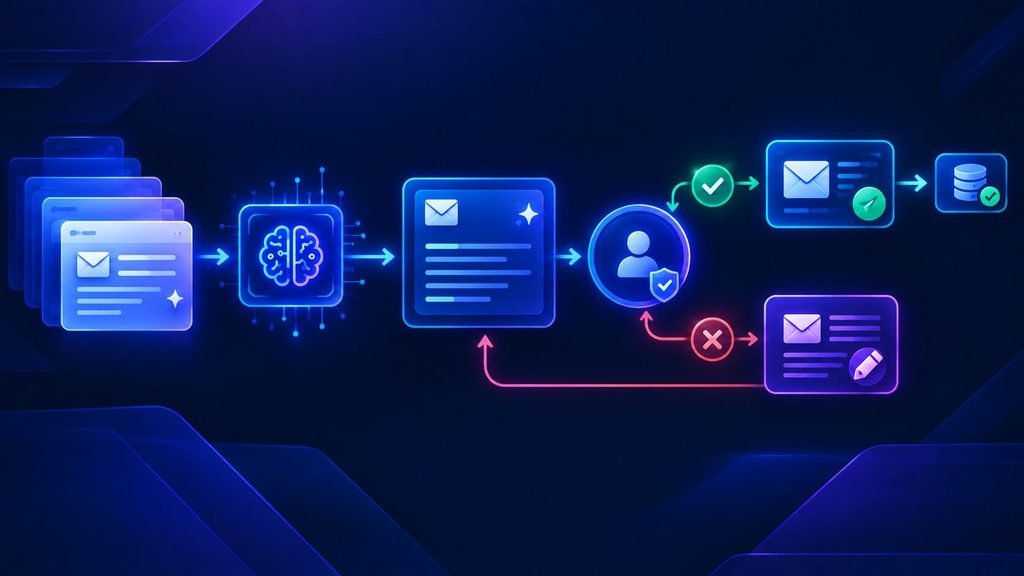
Node 9: Human Approval
For a production workflow, I recommend adding a human approval step before automatically sending important business emails. The architecture becomes:
AI Draft
   ↓
Human Review
   ↓
Approved?
  / \
YES  NO
 |    |
 ↓    ↓
Send  Edit / Stop
The exact approval mechanism can depend on the applications connected to your n8n instance. You could send the draft to an internal approval channel or another system where a person can review it. The reviewer should be able to check:
- Recipient
- Subject
- AI-generated message
- Extracted information
- Classification
- Any important business claims
For workflows that process business emails, AI workflow security best practices are important for limiting data exposure and preventing unsafe automated actions. Only after approval should the workflow continue to the sending step.
Node 10: Send the Email
Once the response has been approved, connect the workflow to your email sending node. Use the original sender’s address as the recipient.
Map:
To:
{{$json.sender_email}}

Subject:
Re: {{$json.subject}}

Body:
{{$json.ai_reply}}
When replying inside an existing email thread, preserve the relevant thread/message information when your email integration supports it. This helps keep the automated response associated with the original conversation.
Node 11: Log the Automation
After the email has been sent, add a logging step.
You can use:
- Google Sheets
- Airtable
- PostgreSQL
- MySQL
- CRM
- Another database
For a simple implementation, create fields such as:
| Field | Example |
|---|---|
| Message ID | 123456 |
| Sender | jane@example.com |
| Category | pricing |
| Priority | medium |
| Reply Generated | Yes |
| Human Approved | Yes |
| Reply Sent | Yes |
| Processed At | Timestamp |
| Status | Completed |
This gives you visibility into what the automation is doing. If an incoming business email contains useful prospect information, you can extend the workflow with lead enrichment and CRM updates instead of simply logging the message.
Node 12: Add an Error Workflow
Don’t stop the build at “Send Email.” Production workflows need an error path.
For example:
Workflow Error
      ↓
Error Trigger
      ↓
Identify Failed Step
      ↓
Log Error
      ↓
Notify Administrator
Useful error notifications include:
- AI request failed
- Email couldn’t be processed
- Required field missing
- Reply failed
- API authentication problem
- Approval timeout
- Unexpected AI output
This allows you to find failures without manually checking every execution.
Complete Node-by-Node Build
Your final workflow can therefore contain these nodes:
| # | Node | Purpose |
|---|---|---|
| 1 | Gmail Trigger | Detect new email |
| 2 | IF | Filter unwanted messages |
| 3 | Edit Fields | Create clean email data |
| 4 | AI Model | Classify email |
| 5 | Structured Output Parser | Convert AI result into structured data |
| 6 | Switch | Route by category |
| 7 | AI Model | Generate response |
| 8 | Edit Fields / Data Source | Supply approved business information |
| 9 | Human Approval | Review response |
| 10 | Gmail / Email Send | Send response |
| 11 | Google Sheets / Database / CRM | Log result |
| 12 | Error Workflow | Handle failures |
You don’t necessarily need every node in the first version. A simple MVP can start with:
Gmail Trigger
      ↓
Edit Fields
      ↓
AI Classifier
      ↓
Switch
      ↓
AI Reply
      ↓
Human Approval
      ↓
Send Email
Then add logging, enrichment, CRM integration, and error handling after the basic workflow has been tested.
Complete Example
Let’s see how the entire workflow handles one email.
Incoming email
From: jane@example.com

Subject: Pricing for your automation workflows

Hi,

We're interested in using your automation workflows
for our sales team.

Could you send me information about your pricing?

Thanks,
Jane
AI classification
The classifier returns:
{
  "category": "pricing",
  "priority": "medium",
  "intent": "Request for pricing information",
  "requires_reply": true,
  "requires_human_review": true
}
Switch
The Switch node sees:
category = pricing
and sends the message to the pricing branch.
AI reply generation
The AI receives:
Category:
pricing

Original email:
We're interested in using your automation workflows
for our sales team. Could you send me information
about your pricing?

Approved business information:
[Current approved pricing information]
It then generates a response based only on the supplied information.
Human approval
The draft is presented to the appropriate person. The person reviews it and approves the message.
Email send
n8n sends the approved response to Jane.
Logging
The workflow records:
Category: pricing
Priority: medium
Reply: sent
Approval: approved
Status: completed
The entire process is now repeatable.
How to Improve the Workflow After Launch
Don’t try to build every feature immediately. Start with a small number of categories and test the workflow with real examples.
For example:
Version 1
Email
 ↓
AI Classification
 ↓
Sales / General / Spam
 ↓
AI Draft
 ↓
Human Approval
 ↓
Send
Version 2
Add:
Information Extraction
CRM Integration
Meeting Detection
Priority Detection
Version 3
Add:
Knowledge Retrieval
Automatic low-risk replies
Advanced error handling
Performance tracking
This incremental approach makes troubleshooting considerably easier. For sales-oriented email workflows, a lead-tracking dashboard for n8n can provide a more useful view of prospects and workflow activity than a basic spreadsheet log.
Testing the Workflow Before Going Live
Before allowing the workflow to send real emails automatically, test it with representative examples. Create test messages for:
- Sales inquiry
- Pricing request
- Meeting request
- Partnership request
- General question
- Spam
- Ambiguous email
- Email with a long signature
- Email containing quoted previous messages
- Email requiring information the AI doesn’t have
Check whether:
- The correct category is selected
- Important information is extracted
- The correct branch is triggered
- The AI avoids making unsupported claims
- Human approval works
- The correct recipient is used
- The email thread is preserved
- The result is logged
- Errors reach the fallback workflow
Only after these tests should you consider enabling automatic sending for selected categories.
The Finished n8n AI Email Automation System
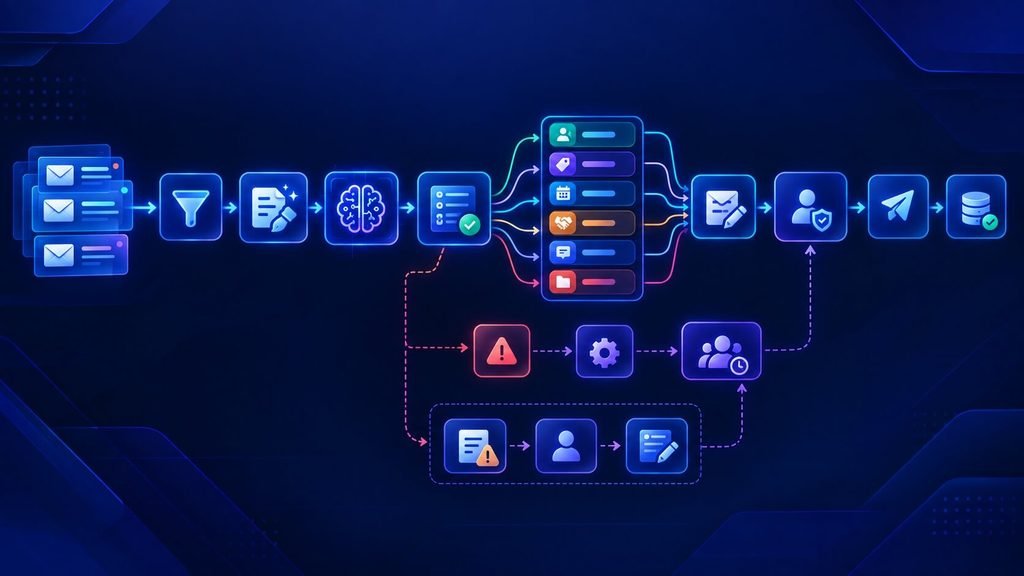
The complete architecture is:
                    ┌───────────────────┐
                    │   New Email       │
                    └─────────┬─────────┘
                              ↓
                    ┌───────────────────┐
                    │ Filter Messages   │
                    └─────────┬─────────┘
                              ↓
                    ┌───────────────────┐
                    │ Clean Email Data  │
                    └─────────┬─────────┘
                              ↓
                    ┌───────────────────┐
                    │   AI Classifier   │
                    └─────────┬─────────┘
                              ↓
                    ┌───────────────────┐
                    │ Structured Output │
                    └─────────┬─────────┘
                              ↓
                    ┌───────────────────┐
                    │      Switch       │
                    └─────────┬─────────┘
                              ↓
          ┌───────────────────┼───────────────────┐
          ↓                   ↓                   ↓
       Sales                Meeting             General
          ↓                   ↓                   ↓
          └───────────────────┼───────────────────┘
                              ↓
                    ┌───────────────────┐
                    │  AI Reply Draft   │
                    └─────────┬─────────┘
                              ↓
                    ┌───────────────────┐
                    │ Human Approval    │
                    └─────────┬─────────┘
                              ↓
                    ┌───────────────────┐
                    │    Send Email     │
                    └─────────┬─────────┘
                              ↓
                    ┌───────────────────┐
                    │    Log Result     │
                    └───────────────────┘

              Errors ─────────→ Error Workflow
Email Trigger
↓
Clean Email
↓
AI Classifier
↓
Structured Output Parser
↓
┌─────────────────────┐
│ Validate AI Output │
└──────────┬──────────┘
┌───┴────┐
↓ ↓
VALID INVALID
↓ ↓
Switch Fallback
↓ ↓
AI Reply Human Review
↓
Approval
↓
Send Email
↓
Log Result
This gives you a complete foundation for an n8n AI email automation system without turning the workflow into a generic customer-support automation. The biggest advantage is that each stage has one job: trigger, clean, understand, route, draft, approve, send, and record.
Once this foundation works reliably, you can connect the email workflow to your CRM, lead qualification system, scheduling workflows, and other business automations.
Step 6: Generate an AI Email Reply
Once the workflow knows what the email is about, AI can prepare a response.
The prompt should contain clear instructions about:
- Tone
- Business context
- Information the AI is allowed to use
- Information it must not invent
- Desired response length
- When human approval is required
For example:
You are an assistant helping draft business email responses.

Read the incoming email and prepare a concise, professional
reply.

Use only the business information provided in the workflow.
Do not invent pricing, policies, product features, guarantees,
or availability.

If the email requires information that is not available,
clearly identify the missing information instead of guessing.

Return only the proposed email response.
This is safer than simply telling an AI model to “reply to this email.”
Don’t let AI invent business information
One of the most important rules in an AI email workflow is to control what information the model can use.
If a prospect asks:
“Can you give me your current annual pricing?”
If the workflow hasn’t supplied current pricing information, the AI shouldn’t invent a number. Instead, the workflow can route the email to a human or retrieve approved information from a trusted source.
Step 7: Add Human Approval Before Sending
Fully automatic email replies aren’t appropriate for every business message.
A better approach is to create different levels of automation.
Low-risk emails
Some repetitive messages may be suitable for automatic responses if the content is predictable and the information is controlled.
Medium-risk emails
Generate the response automatically but require a quick human review.
High-risk emails
Don’t automatically send anything. Route the message to a person for review. This gives you a human-in-the-loop workflow instead of treating every AI-generated response as automatically trustworthy. A simple architecture could be:
AI Draft → Approval → Send
rather than:
AI Draft → Send
Step 8: Send the Email
After approval—or immediately for carefully defined low-risk scenarios—the workflow can send the response through your connected email service.
Before sending, consider validating:
- Recipient address
- Subject
- Message body
- Required fields
- Approval status
- Thread information
This prevents incomplete workflow data from producing unintended messages.
Step 9: Log the Result
The final step is often overlooked. Your automation should record what happened.
Useful fields include:
- Email ID
- Sender
- Category
- AI classification
- Priority
- Response status
- Approval status
- Processing time
- Timestamp
- Error status
You could send these records to a spreadsheet, database, CRM, or another business system. Logging makes it easier to troubleshoot the workflow and understand how much work the automation is actually handling.
Example n8n AI Email Automation Workflow
A practical workflow might look like this:
Email Trigger
↓
Filter Unwanted Messages
↓
Extract Email Content
↓
AI Classification
↓
AI Information Extraction
↓
Route by Category
↓
Generate Response Draft
↓
Human Approval
↓
Send Email
↓
Log Result
This structure keeps the workflow modular. If you later change your AI provider, email platform, CRM, or approval process, you can modify individual sections instead of rebuilding the entire system.
Example: Automating a Sales Inquiry
Imagine a prospect sends:
“Hi, we’re looking for an automation solution for our sales team. Could you tell us what plans are available and whether you offer a workflow for lead qualification?”
The workflow could process the message like this:
1. Email received
n8n detects the incoming message.
2. AI classification
The AI identifies the message as a sales inquiry.
3. Information extraction
The workflow extracts the prospect’s name, company, request, and product interest.
4. CRM routing
The information is sent to the appropriate CRM or lead workflow.
5. Response drafting
AI prepares a professional response using approved business information.
6. Human review
A sales representative reviews the response.
7. Email sent
The approved response is sent.
8. Activity logged
The workflow records the interaction for future follow-up. Notice that the purpose here isn’t to replace the entire sales process. The workflow removes repetitive administrative work while keeping important decisions under human control.
Example: Automating Meeting Requests
Email automation can also handle scheduling-related messages.
Suppose someone writes:
“I’d like to schedule a 30-minute call next week. I’m available Tuesday afternoon or Thursday morning.”
The AI can extract:
Intent: Meeting request
Duration: 30 minutes
Preferred times:
- Tuesday afternoon
- Thursday morning
n8n can then pass this structured information into your scheduling workflow. This is more useful than simply generating a generic response because the email has been converted into structured workflow data.
n8n AI Email Automation Use Cases
The same architecture can be adapted to different business processes.
Sales inquiries
Automatically identify sales-related messages, extract prospect information, and route the conversation to the appropriate sales process.
Meeting requests
Extract scheduling information and pass it into a calendar or scheduling workflow.
Partnership inquiries
Identify potential partnership opportunities and route them to the appropriate person or team.
Internal email processing
Classify internal messages and send them to the relevant workflow or department.
General business inquiries
Prepare draft responses to common questions while allowing human review when necessary.
Email-to-CRM automation
Extract relevant information from incoming emails and create or update CRM records. The key is to design the workflow around a specific business process instead of trying to automate every possible email at once.
How to Make Your n8n AI Email Workflow More Reliable
AI email automation becomes much more useful when you build safeguards around it.
Use structured AI output
Instead of asking AI for a vague response, define the fields your workflow needs.
For example:
{
  "category": "",
  "priority": "",
  "intent": "",
  "requires_reply": true,
  "requires_human_review": true
}
Structured output makes it easier for n8n to make consistent routing decisions.
Add fallback paths
What happens if the AI can’t determine the email category?
Create a fallback.
For example:
Unknown classification → Human review
This is better than forcing the workflow to make an uncertain decision.
Set confidence thresholds
If your AI implementation provides a useful confidence signal, you can use thresholds to determine when automation should continue.
For example:
High confidence → Continue automatically
Low confidence → Human review
The exact threshold should be tested against your own workflow rather than selected arbitrarily.
Separate classification from generation
Don’t make one AI step responsible for everything.
A cleaner architecture is:
Classify → Extract → Route → Generate
This makes the workflow easier to troubleshoot and modify.
Keep sensitive information controlled
Email messages may contain confidential business or personal information. Only send the information necessary for the AI task and consider your organization’s security, privacy, and data-retention requirements before processing email content through an external AI service.
For broader guidance on protecting automated workflows, see our AI workflow security best practices.
Monitor errors
An automation that works 95% of the time still needs an error-handling strategy.
Consider creating notifications for:
- Failed email processing
- AI errors
- Missing fields
- Invalid recipients
- Failed sends
- API failures
- Approval timeouts
A workflow should have a defined path for what happens when something goes wrong.
n8n AI Email Automation vs. Manual Email Processing
Manual email processing requires someone to repeatedly:
- Open the email
- Read the message
- Determine its purpose
- Extract relevant information
- Decide who should handle it
- Draft a response
- Send the response
- Record the interaction
An AI-powered n8n workflow can automate many of these repetitive steps. That doesn’t mean every email should be handled without human involvement. A better objective is to automate the repeatable parts of email processing while leaving decisions that require judgment to people.
How to Measure the Workflow
After deploying the workflow, track whether it is actually improving your process. Useful measurements include:
- Emails processed
- Emails automatically classified
- Drafts generated
- Replies requiring human approval
- Average processing time
- Failed workflow executions
- Incorrect classifications
- Manual interventions
- Time saved
These measurements can help you identify where the workflow needs improvement. For example, if many emails are being sent to the fallback route, your classification categories or prompts may need refinement.
Common Mistakes to Avoid
Automatically replying to everything
Not every email should receive an AI-generated response. Some messages require human judgment.
Using vague prompts
A prompt such as “Reply professionally” doesn’t provide enough business context. Give the model clear instructions and approved information.
Allowing AI to invent information
Never assume the AI knows your current pricing, policies, product details, availability, or contractual terms. Supply trusted information or route the message to a human.
Building one huge workflow
A massive workflow becomes difficult to maintain. Separate classification, extraction, routing, response generation, and logging into logical stages.
Skipping error handling
APIs fail. Email data can be malformed. AI outputs can be unexpected. Build fallback routes from the beginning.
Measuring only email volume
Processing thousands of emails isn’t necessarily a success metric. Look at useful outcomes such as processing time, manual intervention, accuracy, and successful routing.
How This Workflow Fits Into a Larger AI Automation System
Email automation doesn’t have to operate independently.
An incoming email can become the starting point for a much larger business workflow.
For example:
Email → AI Classification → CRM → Lead Qualification → Sales Notification → Follow-Up
Or:
Email → AI Extraction → Scheduling → Calendar → Confirmation Email
Or:
Email → AI Classification → Internal Routing → Task Creation → Notification
This is where n8n becomes particularly valuable: email isn’t just an inbox anymore. It can become an entry point into a broader automated business process. If you’re building your first n8n AI automation, our n8n AI Workflow Automation Tutorial provides a broader introduction to designing AI-powered workflows.
Ready-Made AI Workflow Automation
Building an AI email workflow from scratch gives you flexibility, but it also means configuring triggers, AI processing, routing logic, error handling, testing, and integrations yourself.
If you want to reduce the setup work, WorkflowAISuite is being built around ready-to-use AI-powered business workflows that can be adapted to practical automation use cases. Instead of starting with a blank workflow, you can use a prebuilt system as a starting point and customize it for your business process.
Explore WorkflowAISuite automation workflows →
FAQs: n8n AI Email Automation Workflow
What is n8n AI email automation?
n8n AI email automation uses n8n together with an AI model to process incoming emails, classify messages, extract information, route them to the appropriate workflow, and optionally generate responses.
Can n8n automatically reply to emails?
Yes. An n8n workflow can generate and send email responses when the required email integration and workflow logic are configured. For important messages, a human approval step can be added before sending.
Can n8n use AI to classify emails?
Yes. AI can analyze the content of an email and return a category that n8n can use for routing.
Can n8n extract information from emails?
Yes. AI can turn unstructured email content into structured information such as intent, request type, company name, dates, or other fields relevant to your workflow.
Is it safe to automatically send AI-generated emails?
It depends on the workflow and the type of information involved. Low-risk, well-defined messages may be suitable for automation, while sensitive, financial, contractual, or unusual requests should generally include human review.
Can I connect email automation to a CRM?
Yes. Once an email has been classified and its information extracted, n8n can pass relevant data to other applications supported by your workflow.
What should happen when AI cannot understand an email?
Create a fallback path. Instead of forcing an uncertain classification, send the message for human review or route it to a general processing queue.
Final Thoughts
An n8n AI email automation workflow can turn repetitive inbox management into a structured business process. The most useful approach isn’t simply asking AI to “reply to emails.” A stronger workflow uses AI to understand incoming messages, extract useful information, classify intent, route the message, prepare a response, and record what happened.
A practical architecture is:
Receive → Clean → Classify → Extract → Route → Draft → Approve → Send → Log
Start with one well-defined email process, test it with real examples, add fallback and approval paths, and expand the automation once the workflow performs reliably.
Once the basic automation is reliable, you can extend it toward an AI agent workflow that coordinates multiple business tasks and systems. For businesses building multiple AI-powered processes, the same architecture can eventually connect email with CRM, lead qualification, scheduling, sales operations, and other automated workflows.


One Comment